Furniture – Tool Marks and Altered Joints Confuse Age
There it was! The Federal period (Hepplewhite) dressing table of my wife’s dreams. We only had about 12,000 miles, mostly by foot, invested in the search but finally we had found it. It was exactly the right size: 40″ wide, 31″ high, 20″ deep. Color was excellent, the patina warm and glowing. The sale was virtually completed before we cleared the shop’s doorway. All that remained was a “diligent examination” carried out more to let the seller know he was dealing with a “pro” rather than find problems with this obviously prime specimen. What could possibly be wrong?
First, I checked the top. Early American cabinet makers had their pick of huge trees from old growth forests. It is common to find single boards 20-30″ and more in width used in furniture made in the 18th and early 19th century. The top of this table was a single board of solid mahogany. Its slightly rounded corners were also correct with the normal wear you expect to find in a piece of this age.
The drawer dovetails were certainly hand done. When tails and pins of a hand cut dovetail joint are different sizes with large tails (Figs. 3 & 5), it generally means the joint was made before 1860. After 1860, machines began to be used to cut drawer joints and the machine cut pins and tails are virtually always the same size (Fig. 4 & 6).
Continuing the examination, I ran my fingertips across the outside bottom of the drawer and underneath the top. In early cabinetwork, these hidden surfaces were simply smoothed by hand-held planes. You should generally be able to feel a rippled pattern of uneven parallel tool marks left by the plane. The same surfaces in late 19th century and modern cabinets are generally flat because they were sawed with a machine or planed by machines. (A sawed surface may be rough but it is still essentially flat).
My fingertips also told me the bottoms of the drawers were chamfered (Figs. 8 & 9) which is also correct for period pieces. Chamfering simply means that the front and side edges of drawer bottoms are finished at a slope (the inside top of the drawer is flat). This can be either a straight line or gentle curve, cut and finished by hand-held tools. Drawer bottoms of post-1840 pieces are almost always perfectly flat both top and bottom and the edges are squared off (Fig. 7), not sloped.
Next, I checked the thickness of the veneer. Early veneer was sawed off a block of wood. This produced relatively thick veneers which are almost always at least 1/8″ thick and can be up to almost 1/4″. Later veneers were sliced by a blade off rotating cylinders of wood. The method produced a much thinner veneer, generally 1/32″ to 1/16″ and in much larger sheets.
And yet, something was nagging at me. It was the color inside the drawers that was bothering me. The surface of the frame (case) where the drawers fit was nice and bright (Fig. 13) but the drawer sides, bottom and inside were unusually dark, almost muddy looking. Generally, original surfaces facing the same direction should have been exposed to the same conditions (smoke, grease in the air, etc.) and should logically look very similar. That’s why it is inconsistent for the bottom side of the top to be darker than the bottom side of the top frame piece. (It is, however, normal for the bottom of the lowest drawer to be darker than the bottom of the top. Why? Because the inside of the top was protected from direct exposure to air by the drawers. The lowest drawers were in direct contact with the air.)
The inside back panel was an even darker coloration, again in a spot where it was not expected. This is generally a sure sign of a pigmented wiping stain that certainly was not applied to authentic pre-1840 period pieces. Was this the result of some well intentioned but ham-handed restoration?
I continued my examination with the bottom the large drawer. On closer inspection, the ripples my fingertips found earlier turned out to be exactly the same width, depth, and length and were perfectly straight. This didn’t look like the work of a tired apprentice or a bored journeyman laboring to finish a job (Figs. 10-12). The same uniform pattern of marks was found on the inside of the back panel.
The drawer bottom revealed another vital clue – the presence of very small round wire nails holding the bottom to the back of the drawer. I ruled out an honest modern repair because pains were taken to hide the nail holes with putty. Why putty holes on the bottom of a drawer hidden from sight
Additional close inspection revealed so many inconsistencies that the only question was, Why? The majority of the piece was in fact, made during the Centennial era, ca. mid-1870s. Were all the early features like the thick veneer and drawers, probably scrounged from a period piece, added to fool unsuspecting buyers or merely for decoration? After all, why replace the original top with a single board when two-board tops are perfectly correct for Centennial-era pieces? To me, the planed tool marks leave little room for doubt as to the creator’s intentions.
This piece proves the dangers of using a single test to establish age. Be thorough; always use as many tests as possible to determine authenticity. Be polite, but insist on a thorough examination which includes removing drawers and, if necessary, turning pieces over. If the seller refuses, take that into consideration when deciding to make a purchase.
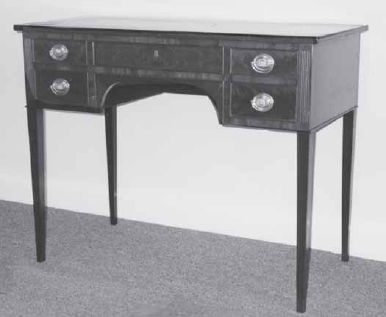
Fig. 1 A carefully constructed fake Federal style dressing table. Some time in its history, faked tool marks and other “clues” were deliberately added to mislead buyers about age and authenticity.
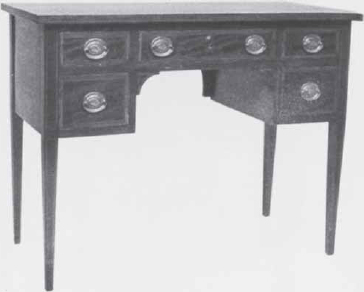
Fig. 2 An original Federal piece, New York, ca. 1785-1815. How can you tell it’s real and not a fake? Learn the signs of early construction and it’s easy to spot impostors.
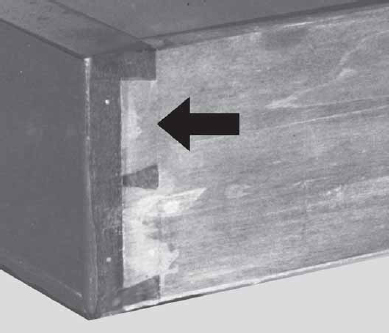
Fig. 3 Large hand cut dovetails are usually proof of early construction. But the stain and patina on the drawer doesn’t match the frame it fits and the wrong nails are used. Conclusion? This drawer is a marriage or a deliberate “plant”.
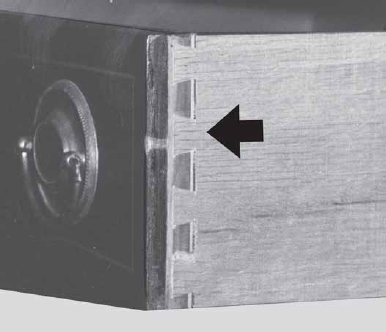
Fig. 4 Machine cut dovetails have pins and tails of equal size and have been used since the mid 1800s. A drawer with joints similar to this was probably intentionally removed from the fake or was damaged or lost over the years.
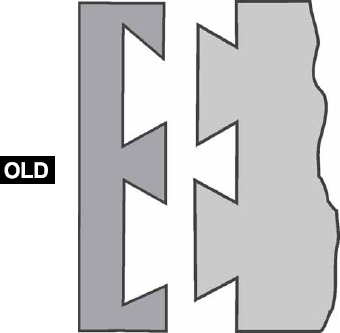
Fig. 5 Side view of typical early hand cut dovetail joint. Tails and pins are unequal size.
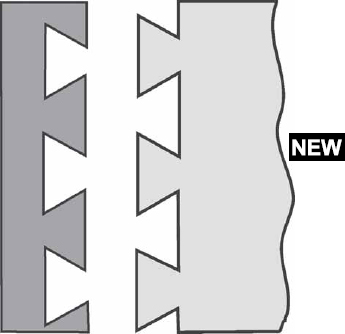
Fig. 6 Side view of typical machine cut dovetail joint. Tails and pins are equal size.
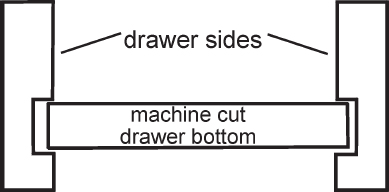
Fig. 7
Cross section view of typical drawer bottom made after ca. 1840-1850. Edges are machine sawed and square, both top and bottom horizontal surfaces are flat.
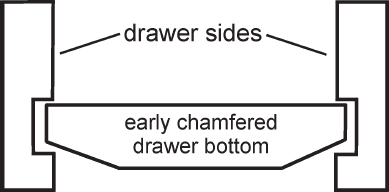
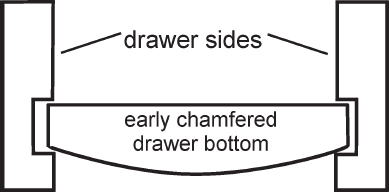
Figs. 8 & 9 Two cross section views of typical chamfered drawer bottoms used ca. 1840-1850. Bottom surfaces slope towards sides, the tops are flat. The slope can be a flat angle as shown in Fig. 8 or curved as in Fig. 9.
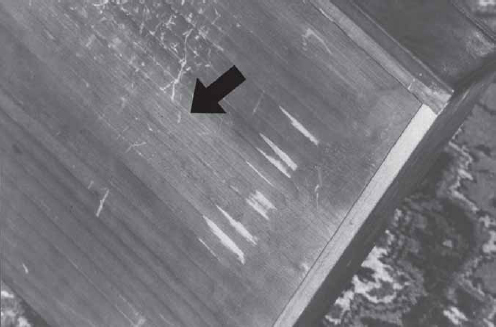
Fig. 10
Early original unseen flat surfaces usually show planing or other smoothing marks. Since these surfaces would never be seen, they were not finished perfectly flat. The faker knew this and tried to simulate plane marks on the bottom of this drawer. His mistake? All the marks are perfectly parallel and almost exactly the same width. This suggests a power tool which made repeated passes with the same bit or cutting blade. Beware of any fixed or regular pattern in what are represented as “tool” marks.

Fig. 11 Evenly spaced, parallel, straight tools marks of equal depth are almost always the sign of modern power tools.

Fig. 12 Authentic marks of early hand-held tools are almost always random in width, depth and spacing.
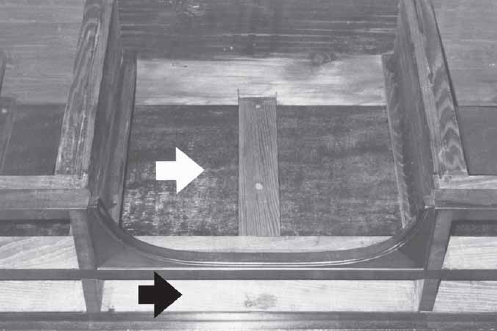
Fig. 13 Frame of table as seen from underneath. Why is the bottom side of the top (white arrow) much darker than the bottom side of the top frame (black arrow)? If the two pieces are original to the piece and have been together since the piece was made, both surfaces should show the same color.